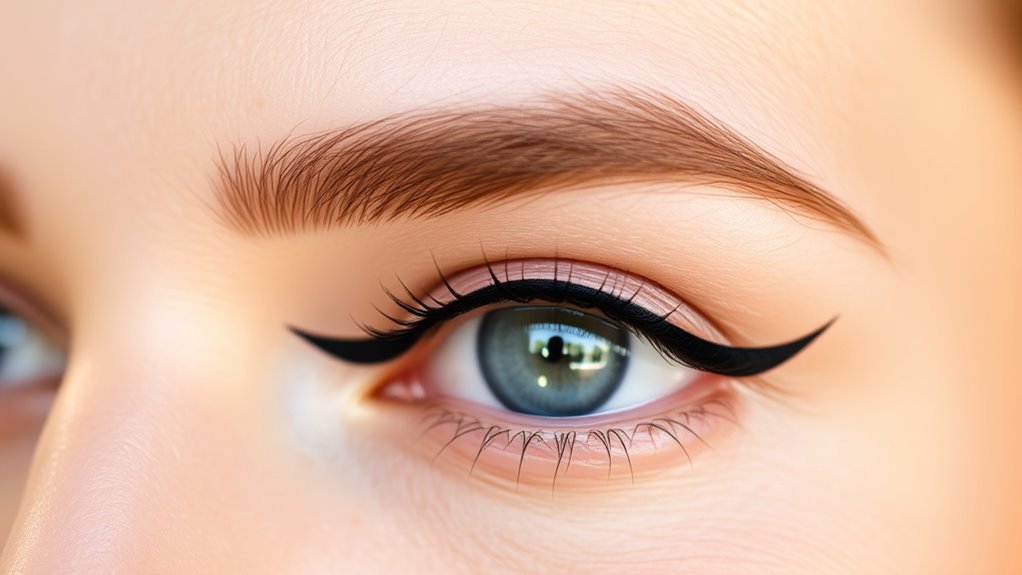
To master winged liner as a beginner, focus on steady hand control by resting your elbow on a flat surface and using a light grip on your brush or pen. Start with small strokes, creating a guide or dot at the outer corner, then connect smoothly to your lash line. Using gel or liquid liners with precise tips helps achieve sharpness, and practice patience to improve symmetry. Keep experimenting, and you’ll discover even more tips along the way.
Key Takeaways
- Start with a small dot or flick at the outer corner to guide your wing shape.
- Use a fine-tipped gel or liquid liner for precise, control, and long-lasting lines.
- Rest your elbow on a flat surface to stabilize your hand during application.
- Build the wing gradually with small strokes instead of trying to draw it in one go.
- Fix mistakes with a cotton swab dipped in makeup remover for clean, sharp edges.

Ever wondered how to master the perfect winged liner? It’s a skill that can elevate your makeup game instantly, but it often feels tricky at first. The key lies in understanding your tools and practicing the right techniques. First, focus on your brush techniques. Using the right brush is essential—you want a fine-tipped brush or a precision liner brush that allows you to draw clean, sharp lines. To create a smooth wing, start by drawing a small dot or flick at the outer corner of your eye, then connect it to your lash line with gentle, steady strokes. Rest your elbow on a flat surface to keep your hand steady, and use slow, controlled motions instead of rushing. Once you get comfortable with your brush, focus on controlling your hand’s movement; a light grip gives you more precision. Remember, it’s better to build up the line gradually rather than trying to do it all in one go.
Next, choosing the right eyeliner formulas can make a big difference. If you’re a beginner, stick to gel or liquid eyeliners with a fine tip, as they provide more control and longevity. Gel eyeliners, especially when applied with a brush, tend to be more forgiving because they set quickly and don’t smudge easily. Liquids with a precise applicator tip give you sharp, defined lines, but they require a steadier hand. Pencil liners are also an option for softer, more natural looks, but they can be harder to perfect for sharp wings. Whatever formula you choose, make sure it’s waterproof or long-lasting so your wing stays flawless throughout the day. Additionally, practicing tent camping techniques can help you stay relaxed and focused during your makeup routine, making application easier.
When applying, start with small strokes to outline the wing, then fill it in carefully. Don’t worry if it’s not perfect on your first try; you can always fix smudges with a cotton swab dipped in makeup remover. To prevent uneven wings, use a piece of tape or a stencils as a guide if needed. Practice makes perfect, so don’t stress if your first few attempts aren’t perfect. Over time, you’ll develop a steady hand and an eye for symmetry. Remember to take your time and adjust as needed—winged liner is about precision and confidence, not speed. With consistent practice and the right tools, you’ll soon be creating flawless wings that lift and frame your eyes beautifully.
Frequently Asked Questions
What Tools Are Best for Beginners?
You should start with a fine-tipped brush, like a gel liner brush, for precise control, and try pen options such as a liquid or felt-tip eyeliner for ease of use. These tools help you create sharp, clean lines and are gentle for beginners. Opt for flexible brushes to build confidence, and experiment with pen options to find what feels most comfortable and helps you achieve that perfect winged look.
How Do I Fix Uneven Wings?
To fix uneven wings, start by evaluating your wing shape and identifying the side that needs adjustment. Use a small brush or Q-tip dipped in concealer to clean up and sharpen the edges. Re-draw the wing, ensuring symmetry by matching the angle and length of both wings. Keep your hand steady, and don’t be afraid to erase and redo until you achieve balanced wing shape and wing symmetry.
Can I Wear Winged Liner Daily?
You can absolutely wear winged liner daily if you keep up with proper winged liner maintenance. It’s all about choosing a long-lasting formula and gentle removal at night. Stay inspired by winged liner inspiration to keep your look fresh. Just remember, a little daily wear might require extra touch-ups, but with good habits, you can rock that fierce flick every day without any worries.
What’s the Best Way to Remove Winged Liner?
To remove winged liner effectively, start with the best makeup removers like micellar water or oil-based cleansers. Gently soak a cotton pad, then press it onto your closed eyelid for a few seconds to loosen the product. Avoid rubbing harshly to prevent irritation. Carefully wipe away the liner, following the wing’s shape. Repeat if needed, then cleanse your face thoroughly to make certain all residue is gone.
How Do I Make My Winged Liner Last All Day?
Think of your winged liner as a masterpiece that needs a sturdy frame to stay perfect all day. Start with a good eyeshadow primer to create a smooth canvas, then set your liner with a matching eyeshadow for extra staying power. If you have eyelash extensions, be gentle around the lash line. Seal everything with a long-lasting setting spray, and your wings will soar flawlessly from dawn to dusk.
Conclusion
Think of your winged liner as a guiding star, leading your confidence through the night. With each flick, you’re not just creating a look but illuminating your unique style. Remember, even stars have their imperfections, and that’s what makes them beautiful. So, embrace your journey, trust your instincts, and let your wings soar high. Your eyes are the night sky—your liner, the shining constellation that shows the world your inner light.