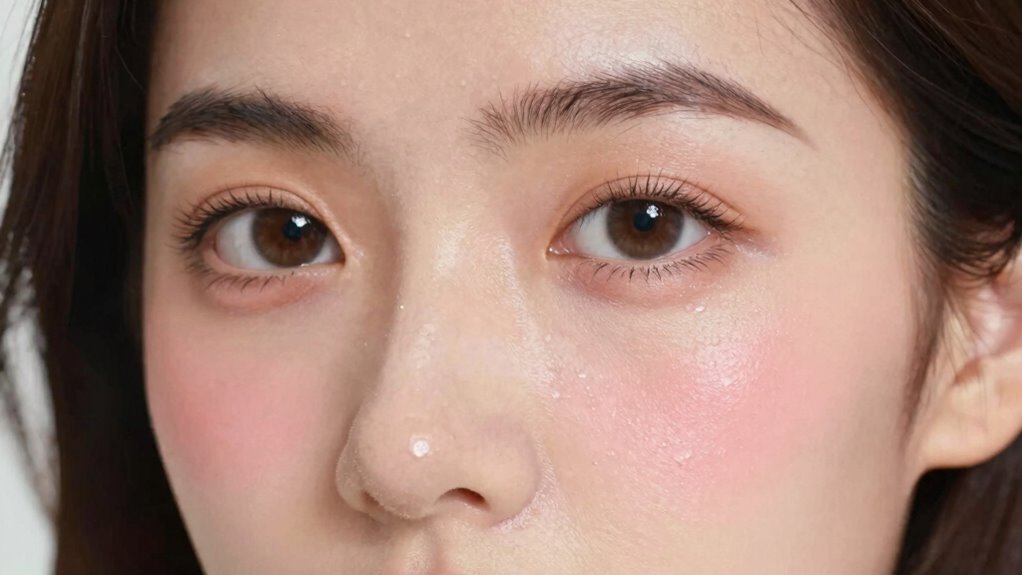

To instantly lift your features, try shifting your blush placement higher and outward toward your temples. Place the blush just above the apples of your cheeks and blend diagonally toward your temples, softening edges for a natural glow. This technique emphasizes your cheekbones and creates a more youthful, sculpted look in seconds. Small adjustments in your blush placement can make a big difference. If you want to perfect this technique, there’s more to discover that can enhance your application even further.
Key Takeaways
- Elevate blush placement above the apples of the cheeks toward the temples for an instant lift.
- Blend blush diagonally outward to enhance cheekbone definition and create a more sculpted look.
- Focus on soft, seamless blending to avoid harsh lines and achieve a natural, lifted appearance.
- Adjust blush placement based on face shape to emphasize facial structure and youthful features.
- Use a fluffy brush to diffuse color upward, enhancing the effect of lifted, radiant facial features.
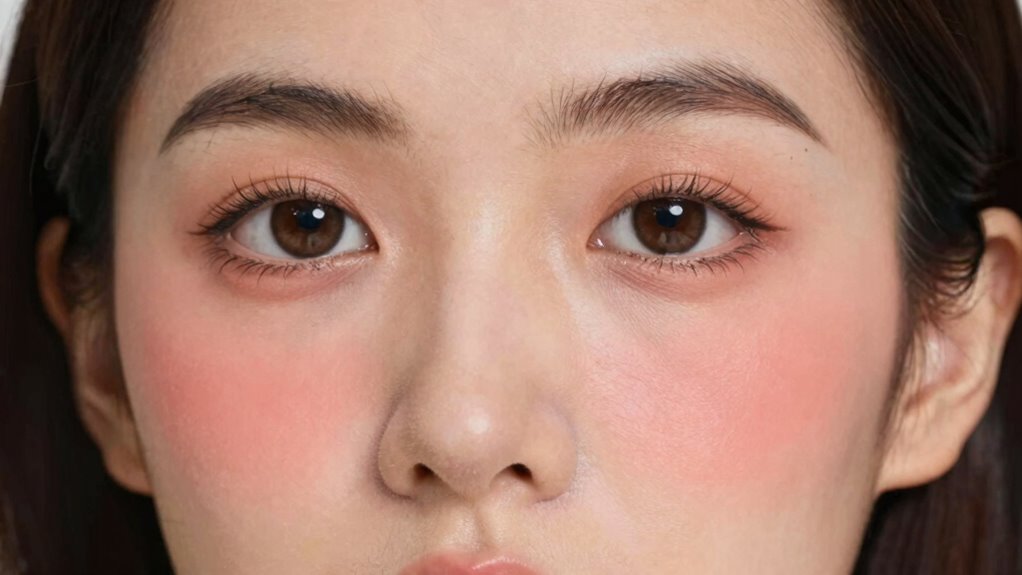
If you’ve been applying blush the same way for years, it might be time to switch things up. Changing your blush placement can instantly lift your features and give your face a more youthful, refreshed look. The key lies in understanding makeup techniques and skin tone considerations that can make a noticeable difference. Instead of just sweeping blush across the apples of your cheeks, try shifting the placement slightly higher and outward toward your temples. This subtle change can enhance your cheekbones and create the illusion of a lifted face.
Elevate your blush placement for a youthful, lifted look by shifting it slightly higher toward your temples.
When you focus on makeup techniques that elevate your blush position, you’re also paying attention to the natural structure of your face. For example, placing blush just above the apples and blending it diagonally towards the temples emphasizes your cheekbones and lifts the lower part of your face. This method works especially well if you want a more sculpted look, making your face appear more defined and radiant. The transition from traditional placement to a higher point takes some practice, but the results are worth it. Additionally, understanding facial anatomy can help you target the right areas for a more natural and effective lift. Knowing how to adapt your technique based on your face shape can further improve your overall look.
Another vital aspect to consider is your skin tone. Different skin tones respond differently to blush placement and shades. For fair skin, soft pinks or peach hues applied slightly higher can brighten your complexion without overwhelming your features. Medium skin tones benefit from warm corals or bronzy shades that lift and add warmth. Deeper skin tones look stunning with rich terracottas or berries, applied with a light hand higher on the cheekbones to highlight and lift. Adjusting the placement based on skin tone considerations ensures your look appears natural and enhances your unique features.
As you experiment with this change, remember to blend softly and seamlessly. Use a fluffy brush to diffuse the blush outward and upward for a natural lift. The goal is to avoid harsh lines, instead creating a gradient that mimics your skin’s natural flush. The technique is simple but effective: start with a light hand, build gradually, and focus on blending toward the temples. This approach can dramatically transform your face, making your features pop and giving you a more youthful, energetic appearance. Knowing makeup techniques is essential to achieving the best results with this subtle adjustment. Incorporating blush placement techniques into your routine can help you refine your look and find what works best for your face.
Incorporating this blush placement change into your routine doesn’t mean you have to abandon your favorite shades or techniques. Instead, it’s about refining your approach for a more flattering and lifted look. With a bit of practice and attention to skin tone considerations, you’ll find that a small shift in placement creates a big difference. It’s a quick way to refresh your makeup routine and feel more confident in your skin.

e.l.f. Angled Blush Brush, Face Makeup Brush For A Sculpted Look, Great For Cream, Liquid Or Powder Blush, Bronzers & more, Vegan & Cruelty-Free
- Versatile for Cream, Liquid, Powder: Suitable for blush, bronzers, highlighters
- Precise Sculpted Application: Slanted shape for detailed contouring
- Ergonomic & Comfortable Grip: Designed for easy handling and control
As an affiliate, we earn on qualifying purchases.
As an affiliate, we earn on qualifying purchases.
Frequently Asked Questions
How Long Does the Blush Placement Effect Typically Last?
The blush placement effect usually lasts around 4 to 8 hours, depending on your skin type and product choice. For better blush longevity, opt for long-wear formulas and set your makeup with a light dusting of setting spray. Proper placement guarantees durability, so focus on blending well. Keep in mind, factors like sweating or touching your face can affect placement durability, making your blush fade sooner.
Can This Blush Placement Technique Be Used for All Face Shapes?
You can definitely use this blush placement technique on all face shapes; it’s versatile enough to work across the board. Think of it as hitting two birds with one stone—enhancing features and achieving blush harmony. The key is to adapt the placement slightly based on your face shape, whether round, oval, or square. With a little tweaking, you’ll lift your features instantly and create a balanced, natural glow.
What Tools Are Best for Precise Blush Placement?
For precise blush placement, use a fluffy blush brush to blend seamlessly, ensuring a natural look. An angled or tapered blush brush works best with your application technique, allowing you to target specific cheek areas and lift features. Light, sweeping motions help avoid harsh lines. Always start with a small amount of product and build gradually, focusing on the apples of your cheeks and blending upward for an instant lift.
Is This Technique Suitable for Beginners?
Think of this technique as a gentle dance, guiding your brush with confidence. It’s quite suitable for beginners because it emphasizes color blending and product compatibility, making the process forgiving and easy to master. With patience, you’ll find it helps lift your features naturally. Just start softly, blend well, and choose the right blush formula. Soon, you’ll be orchestrating a flawless, flattering look that highlights your best features effortlessly.
Does Skin Type Affect the Blush Placement Outcome?
Your skin type can influence how blush placement looks, especially when considering your skin tone and blush harmony. For example, oily skin might need a lighter touch to avoid excess shine, while dry skin can hold color more vividly. Understanding your skin tone helps you choose the right blush shade, ensuring it complements your overall look. Proper placement enhances your features, making the blush blend seamlessly and lift your face naturally.
Conclusion
By shifting your blush placement higher on your cheeks, you instantly lift and brighten your features, creating a more youthful appearance. Imagine applying blush just above your apples, blending upward—like Sarah, who noticed her face looked more lifted and refreshed after this simple change. Try it yourself: a small tweak can make a big difference, giving you a natural, radiant glow. So go ahead, experiment with your blush placement and see the instant lift!