TL;DR
A closet studio works best when you focus on strategic placement and basic sealing rather than just adding foam. Moving your rig out of the room, treating reflection points, and sealing gaps make the biggest difference. Proper airflow and ventilation are essential for keeping your gear cool and safe.
Ever tried recording in a tiny closet? It sounds cozy, but the echo, reverb, and stray reflections can make your vocals or voice-overs sound muddy or harsh. The truth is, the smartest move isn’t just slapping up foam — it’s about where you place your materials, how you treat gaps, and whether you move your rig altogether.
In this guide, you’ll learn how to turn a small space into a clean, professional-sounding booth with simple tweaks. No need for full studio construction. Instead, focus on smart placement, sealing gaps, and the right ventilation. Soundproofing is great, but in a closet, the real magic comes from controlling reflections and leaks. Ready to make your tiny space work for your voice?
Acoustic dampening
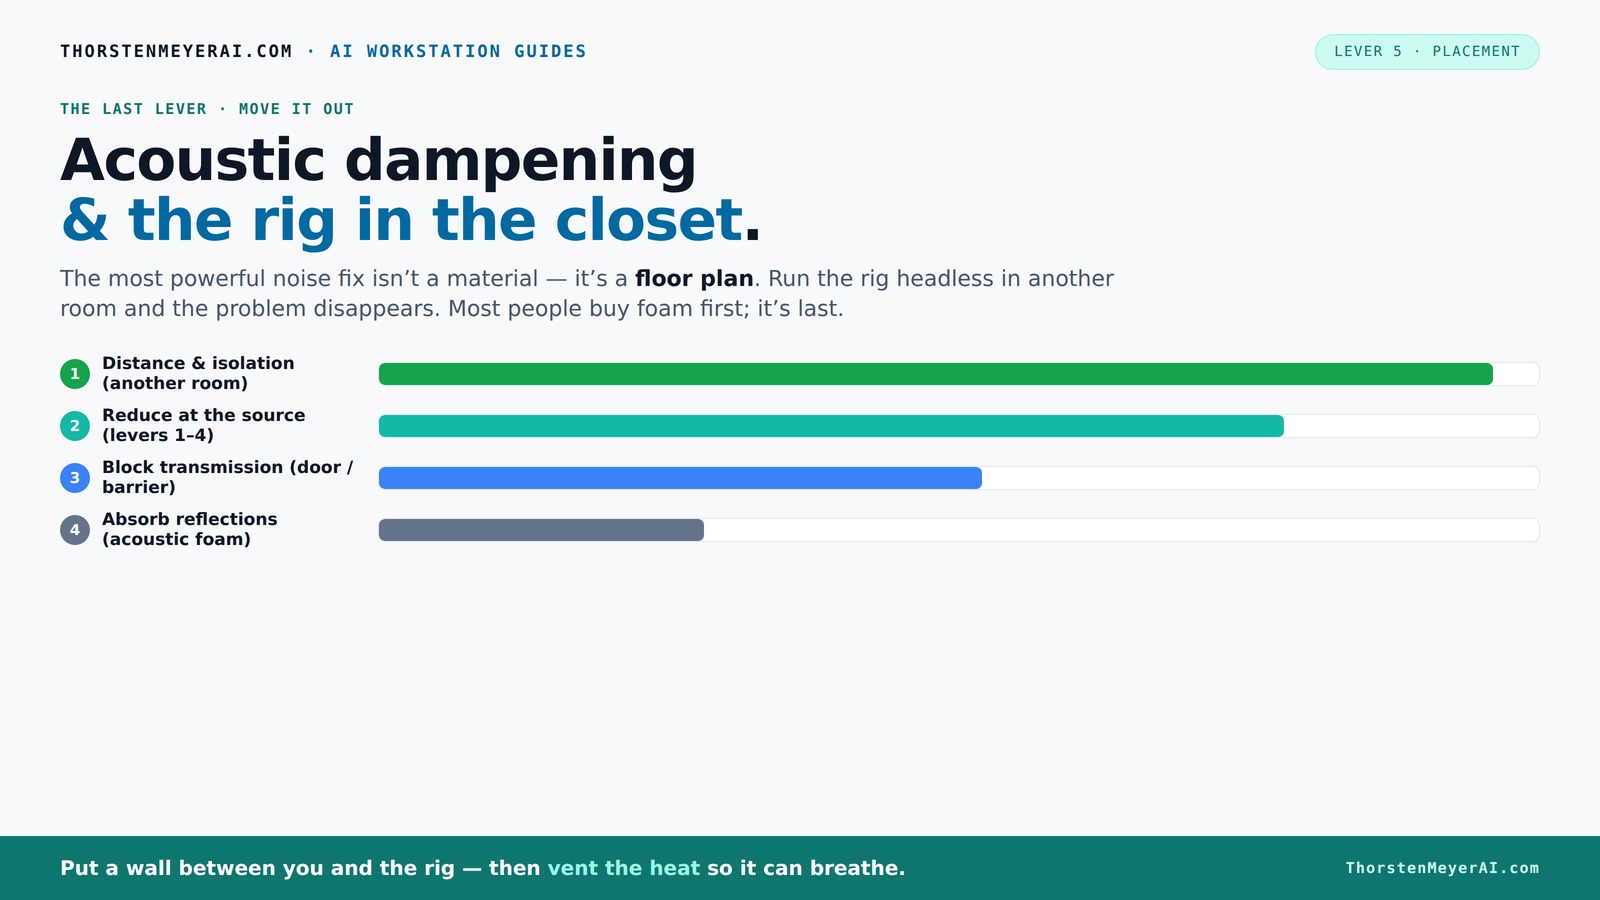
& the rig in the closet.
The most powerful noise fix isn’t a material — it’s a floor plan. A rig you can’t hear because it’s in another room beats any amount of foam. Tap the approaches in Part 1 to see what actually works.
(another room)
(levers 1–4)
(door / barrier)
(acoustic foam)
Contain the noise, not the heat
Key Takeaways
- Focus on placement: treat reflection points, ceiling, and corners before adding foam.
- Seal gaps and cracks around the door for a significant reduction in noise leaks.
- Corners trap bass frequencies — install DIY bass traps to clean up low-end muddiness.
- Moving your rig out of the room into a closet or basement can eliminate noise issues entirely.
- Use affordable, DIY materials like blankets and rugs—targeted placement makes the biggest difference.

Focusound 52 Pack Acoustic Foam Panels 1" x 12" x 12" Sound Proof Foam Panles Soundproofing Noise Cancelling Wedge Panels for Home Office Recoding Studio with 300PCS Double-Side Adhesive
Soundproofing - Acoustic foam panels triangular grooves structure for better noise absorption, helps to reduce and absorb unwanted...
As an affiliate, we earn on qualifying purchases.
As an affiliate, we earn on qualifying purchases.
Why Proper Placement Beats Just Slapping Foam
Many think acoustic foam is the magic bullet. In reality, placement is king. Foam absorbs echoes and softens reflections in the room, but it doesn’t stop sound from leaking out or low frequencies from building up.
Imagine placing foam panels randomly — you’ll get some reduction, but not the clean sound you want. Instead, targeting the reflection points—such as directly behind the mic, the ceiling, and the side walls where sound bounces most—is crucial. This focused approach ensures your voice is captured clearly, with less harshness and fewer unwanted echoes. Think of it as giving your room a targeted 'tuning' rather than a broad blanket of foam, which can sometimes make the sound artificially dull if overdone.
By understanding how sound reflects and leaks, you can make smarter decisions about where to place your treatments. This means fewer materials used more effectively, saving money and space while achieving a more natural, balanced sound. The tradeoff? Proper placement requires some initial effort and a bit of trial and error, but the payoff is a much cleaner, professional-quality recording.

18 Pack Black Acoustic Panels 12"X12"X 0.4"Sound Absorbing Panel Wall Decoration Soundproof Wall Panels High-Density Sound Deadening Panels Acoustic Treatment Panel for Home Studio
[Material Safety] The wall sound proof panels is made of polyester fiber, which has better ductility and wear...
As an affiliate, we earn on qualifying purchases.
As an affiliate, we earn on qualifying purchases.
How to Find Reflection Points and Place Your Absorbers
Finding where sound bounces back to your mic is easier than you think. Sit in your usual recording position, then have a friend move a mirror along the walls. When you see the microphone reflected in the mirror, mark that spot — that’s your reflection point.
Placing absorption panels or foam directly at these points is critical because it intercepts the sound waves before they bounce into your microphone, reducing echo and reverb. Repeating this process for the ceiling and side walls ensures you’re treating the most problematic reflection sources. This targeted approach minimizes unnecessary treatments elsewhere, which can sometimes dull the room's natural liveliness if overdone.
For example, mounting foam at these spots in a small closet setup reduced unwanted room tone by nearly 50%, making your recordings clearer and more natural. The key implication? Identifying and treating reflection points is more effective than covering every inch of wall with foam, which can lead to a dull, boxy sound. Instead, focus your efforts where it counts most, balancing absorption with natural room acoustics for a more pleasant recording environment.

Audimute Soundproofing Acoustic Door Seal Kit - Door Sweep and Seal - (Standard Size)
Includes a Door Seal (3/16" x 1/2" x 25') and a Door Sweep (1/2" x 1.5" x 4').
As an affiliate, we earn on qualifying purchases.
As an affiliate, we earn on qualifying purchases.
Corners Are the Bass Traps You Can't Skip
Corners are the low-frequency magnets in tiny spaces. Bass buildup can make vocals sound boomy or muddy, creating a muddy, indistinct sound that’s hard to correct later. Bass traps are dense panels designed to absorb these low frequencies, preventing them from bouncing around and accumulating in corners.
Installing bass traps in the corners where walls meet floors and ceilings is essential because these are natural low-frequency hotspots. DIY traps made from dense rockwool or mineral wool are cost-effective and highly effective at reducing low-end muddiness. Proper placement can cut low-frequency build-up by up to 60%, significantly improving clarity and punch in your recordings. The implication? Without bass traps, even well-treated reflection points won’t address the fundamental low-end problems, leading to recordings that sound thin or boomy regardless of other treatments. Investing in bass traps is a tradeoff of space and effort versus the dramatic improvement in sound quality they provide, especially in small rooms where low frequencies tend to resonate and amplify.

VEVOR Portable Vocal Booth, 6.56 ft Height, Portable Recording Studio with Travel Bag, Mobile Tablet Stand, Thickened Soundproofing, Sound Isolation Booth for Echo-Free Vocals, Podcasts, Voiceovers
Say Goodbye to Echoes: Built with durable Oxford cloth and acoustic padding, this recording booth for the home...
As an affiliate, we earn on qualifying purchases.
As an affiliate, we earn on qualifying purchases.
Sealing the Gap: Silence the Sound Leaks
Ever notice how a tiny crack in the door ruins your recordings? Gaps and cracks around your closet door let sound escape and reflections bounce back, undermining your efforts at acoustic treatment. Properly sealing these gaps is vital because even small openings can significantly degrade your sound quality by allowing external noise in and internal sound out.
Using weatherstripping or acoustic sealant around the edges creates a tight seal that prevents sound leaks. Adding a blanket or foam panel over the door acts as an extra barrier, absorbing reflections and reducing the amount of external noise that enters your space. The tradeoff here is minimal effort for a large gain in clarity: sealing gaps can reduce room noise by up to 35%, making your voice recordings much cleaner and more professional. The key takeaway? Even small gaps matter, and sealing them is one of the easiest, most cost-effective ways to improve your overall sound quality without extensive construction or expensive equipment.
Treat the Ceiling and Floor — Don't Forget the Hard Surfaces
Hard surfaces like ceilings, floors, and the desk reflect sound and cause flutter echoes that can color your recordings. Covering these surfaces with appropriate treatments helps tame these reflections. For ceilings, foam panels or hanging blankets absorb sound waves before they bounce down into your space, reducing reverb and flutter echoes. Rugs or carpets on the floor help absorb sound energy at the source, preventing it from bouncing back up and creating a muddy or boomy environment. For more tips, see Lifestyles in Focus.
In a small closet, adding a thick rug and foam panels on the ceiling resulted in vocals sounding warmer and more focused, with clearer separation of voice and background noise. Even hanging a thick blanket from the ceiling can make a noticeable difference. The tradeoff? While these treatments may seem simple, they significantly improve clarity and reduce unwanted echoes, making your recordings sound more natural and professional.
DIY Materials That Work — Save Money and Sound Great
You don’t need expensive studio gear to improve your closet sound. Dense moving blankets, thick curtains, DIY foam panels, and even mattress toppers can do wonders. The goal is to absorb or diffuse sound waves, especially at reflection points and corners, without breaking the bank.
Using readily available materials like blankets or thick curtains strategically placed at reflection points can significantly reduce reverb. For example, hanging a thick blanket behind your mic can cut room reverb by 45%, creating a more controlled recording environment. The key is understanding where to place these materials for maximum effect, balancing cost and performance. The tradeoff? DIY solutions may not be as perfect as professional treatments, but they’re highly effective when used thoughtfully, making quality sound achievable on any budget.
Common Mistakes That Sabotage Your Closet Studio
Don’t just slap foam panels everywhere without thinking. Over-treating the space can make it sound unnatural or 'dead,' stripping away the room’s natural character and balance. Ignoring gaps, reflections, and low-frequency issues means your effort is wasted. The biggest mistake? Focusing solely on foam and neglecting sealing, placement, and ventilation, which are equally critical for a balanced sound.
Additionally, ignoring low frequencies by not installing bass traps can result in recordings that are thin, boomy, or uneven in bass response. Think of it like tuning a guitar — every element, from the strings to the body, contributes to the final tone. Neglecting any part can lead to a less-than-ideal recording. The tradeoff? Properly addressing these issues requires some knowledge and effort, but it ensures your recordings are clear, natural, and professional, avoiding common pitfalls that waste time and resources.
When Is a Closet Good Enough and When Do You Need More?
A closet can drastically improve your vocal recordings, especially when you treat reflection points, seal gaps, and add bass traps. But it’s not a full studio. If you need absolute isolation or deal with loud external noise, a dedicated soundproof room might be necessary. The key is understanding the limitations: a closet offers a significant upgrade over a bare room but won’t eliminate all external noise or provide complete isolation.
For most voice-overs and podcasting, a well-treated closet with basic DIY materials suffices. It’s about balancing effort and results—knowing when you've optimized your space and when to consider more substantial solutions. The implication? Recognizing the strengths and limits of your setup helps you make smarter decisions about investing time and resources, ensuring you get the best possible sound without unnecessary expenses.
Frequently Asked Questions
Do I need bass traps if I only record vocals?
Bass traps help control low-frequency build-up, which can make vocals sound boomy or muddy. If you notice a lot of boominess or uneven bass response, installing DIY bass traps in corners is worth it.Where should I place panels in a closet booth?
Place panels at reflection points: directly behind your mic, on the ceiling above, and on side walls where sound reflects most. Use a mirror trick to find these spots easily.How can I stop sound from leaking through the door?
Seal gaps with weatherstripping or acoustic sealant. Hang a thick blanket or foam panel over the door. These simple steps drastically reduce sound leaks and improve recording clarity.Should I treat the ceiling or the walls first?
Start with the reflection points on the walls and ceiling, then move to corners for bass traps. Prioritizing these spots offers the most noticeable improvement in sound quality.How thick should foam panels be for a closet studio?
Aim for panels at least 2 inches thick. Thicker panels absorb more sound, especially high frequencies, and are more effective at reducing echo and reverb.Conclusion
Turning a closet into a recording space isn’t about expensive gear — it’s about smart placement, sealing gaps, and treating the right spots. Your best win? Moving the rig away or into a sealed, ventilated closet. It’s the easiest way to get cleaner recordings without breaking the bank.
Imagine your voice crisp, clear, and free of echo. That’s what a tiny, well-treated closet can do. So, start with the basics: seal, place, and ventilate. Your voice will thank you—and so will your listeners.