
To create swirling water marble nails at home, gather your favorite nail polishes, filtered water, and a sharp tool like a toothpick. Drop polish onto the water surface to form colorful concentric circles and freely swirl or manipulate the design for unique patterns. Dip your nail carefully to transfer the pattern, then clean up any excess around your cuticles. Practice different color combinations and techniques to perfect your style—keep going, and you’ll discover more stunning effects.
Key Takeaways
- Prepare your supplies, including nail polishes, water, and tools for precise application and cleanup.
- Create swirling patterns by dropping and manipulating polish on water’s surface for unique marbled designs.
- Dip your nail into the water to transfer the pattern, then clean excess polish around the nail.
- Use a toothpick or fine brush to refine or add intricate swirls for a professional look.
- Practice regularly and experiment with color combinations to perfect your water marble nail technique at home.

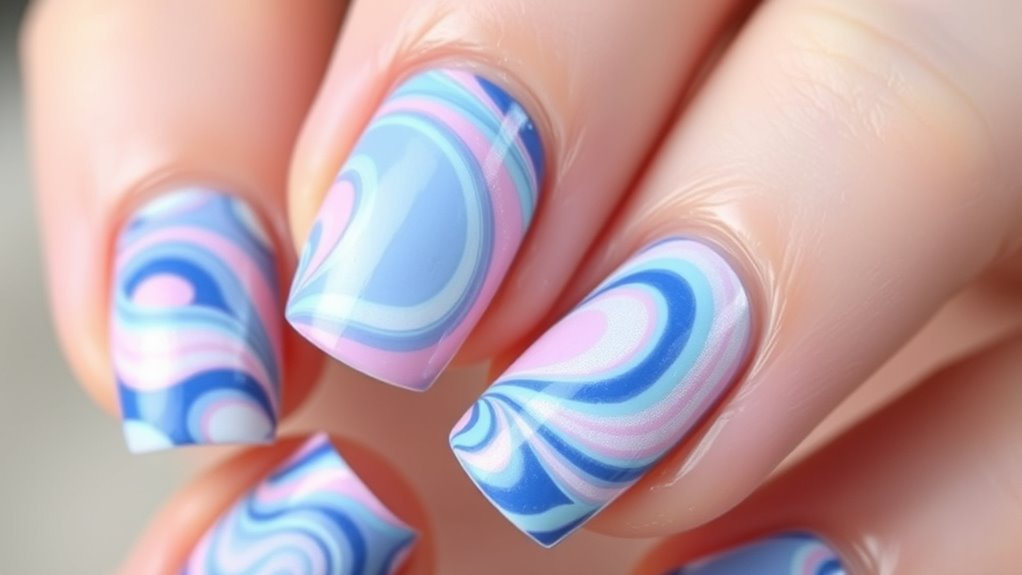
Have you ever wondered how to create stunning, swirling nail designs without visiting a salon? Water marble nails make it possible, and all you need is a steady hand, some basic supplies, and a little patience. The key to achieving that mesmerizing, swirling pattern lies in mastering color blending and finding the right design inspiration. When you start, pick out two or three nail polish shades that complement each other. Lighter shades can create soft, dreamy effects, while darker colors add drama and contrast. The magic happens when you drop these colors onto the water’s surface, where they spread and blend together, forming intricate, marbled patterns. Your goal is to manipulate the polish on the water to produce the desired swirling effect, which gives each nail a unique, artful look.
To get started, fill a small cup with room temperature water—preferably filtered or distilled to avoid impurities. Then, choose your nail polish shades and open them nearby. Using a toothpick or a thin pin, carefully drip a drop of polish onto the water’s surface. When the drop hits, it creates a thin film that spreads out. Add more drops, focusing on creating concentric circles or overlapping designs that blend seamlessly. The way the colors interact is what creates the beautiful, swirling patterns. To enhance your design inspiration, look at images of water marble nails online or in magazines. Notice how different color combinations and swirling techniques produce various effects, and then experiment with those ideas. Color blending techniques can help you achieve smoother transitions and more harmonious designs.
Once you’re happy with your pattern, it’s time to transfer it onto your nails. Use a toothpick or a fine brush to gently create swirls or refine the design. When it looks just right, carefully dip your fingertip into the water, aligning it over the design. Use a piece of tape or a cotton swab to remove excess polish around your nail before pulling your finger out. The polish will stick to your nail, capturing the stunning swirling pattern. Clean up any excess polish around your cuticles with a brush dipped in nail polish remover.
Creating water marble nails at home might seem tricky at first, but with a little practice, you’ll develop a keen eye for color blending and pattern design. Your ability to draw inspiration from different color schemes and swirling techniques will grow, helping you craft truly unique nail art every time. The process is rewarding, and each set of nails will be a one-of-a-kind masterpiece. So, gather your favorite shades, find some inspiration, and start swirling—beautiful, intricate nail art is within your reach.

Titoclar Water Marbling Paint Kit, DIY Arts and Crafts Kit for Girls & Boys 4-8 6-12, Creative Art Supplies, Birthday Gifts for Kids Ages 3+
- Unique water marbling painting: Create patterns on water and transfer to surfaces
- Complete art supplies included: 10 paint colors, 20 sheets, brushes, and tools
- Safe and non-toxic materials: Environmentally friendly, ASTM D-4236 certified
As an affiliate, we earn on qualifying purchases.
As an affiliate, we earn on qualifying purchases.
Frequently Asked Questions
What Tools Are Best for Creating Water Marble Nails?
You’ll want to use fine-tipped brushes for detailed line work and clean edges when creating water marble nails. A shallow, wide container like a plastic or glass dish works best for easy movement of your polish. Choose container options that are large enough for your nails without spilling, and opt for brushes with durable bristles to help you achieve precise swirling patterns. These tools make your water marble designs easier and more professional-looking.
How Long Does a Water Marble Manicure Last?
A water marble manicure lasts about a week, like a delicate bloom in full sun. To keep it vibrant, you should consider nail durability and follow maintenance tips like applying a top coat every couple of days and avoiding harsh chemicals. Proper prep, gentle handling, and regular touch-ups help extend its lifespan. With care, your swirling patterns can stay stunning, turning heads for days longer than expected.
Can Water Marble Nails Be Done on Artificial Nails?
Yes, you can do water marble nails on artificial nails. Just make certain they’re compatible with water marble techniques and use a water marble adhesive or a strong top coat to help the design stay in place. Keep in mind that synthetic nails might be more prone to chipping, so handle them gently. With the right preparation, you’ll achieve stunning swirling patterns that last and look fantastic.
Are There Any Safety Concerns With Water Marble Nail Polish?
Think of water marble nail polish as a delicate dance where safety takes the lead. You should be aware of chemical fumes that can irritate your skin or cause discomfort if inhaled in large amounts. Always work in a well-ventilated area, wear gloves to protect your skin, and avoid prolonged exposure. Taking these precautions keeps your creative process fun and safe, so your nails shine without worries.
How Can I Fix Mistakes During the Water Marble Process?
To fix mistakes during the water marble process, start by correcting smudges with a small brush dipped in nail polish remover, gently cleaning the area. To avoid bubbles, make certain your polish is not too thick and don’t overload your brush. If bubbles form, lightly blow on the surface or let the polish sit to release trapped air before swirling. Act quickly to keep your design neat and flawless.
Conclusion
Now that you know how to create stunning water marble nails at home, you’re all set to impress. Just remember, practice makes perfect, and don’t be discouraged if your first few attempts don’t turn out flawless. With patience and a steady hand, you’ll soon master swirling patterns that truly stand out. Think of it as painting a picture in water — it takes time, but the end result is worth every drop!